Create CloudFront for Frontend (S3)
Create a CloudFront Distribution for the Frontend (S3)
ℹ️ Objective
- Create a second CloudFront Distribution, this time specifically for serving the static frontend files from the S3 bucket.
- Speed up page load times: CloudFront will cache the frontend files (HTML, CSS, JS, images) at its global Edge Locations, allowing users everywhere to access the website with the lowest possible latency.
- Enhance security: We will configure an Origin Access Identity (OAI). An OAI is a special virtual user created by CloudFront. We will grant this OAI permission to read files in our S3 bucket and then lock the bucket down, preventing any other public access. This ensures that all users must go through CloudFront to view your website.
🔒 Steps to Follow
1. Start Creating the Distribution
- In the AWS Management Console, return to the CloudFront service.
- Click on Create distribution.
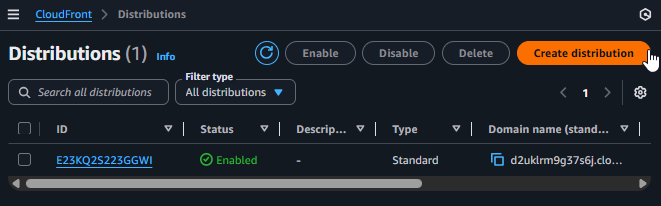
Start creating a new CloudFront Distribution
2. Configure the Origin
- Origin domain: Click in this box and select your S3 bucket from the list:
ors-fe.s3.ap-southeast-1.amazonaws.com. - Origin access: This is the most critical security configuration step.
- Select
Legacy access identities. - Origin access identity: Click on Create new OAI.
- Leave the default name and click Create.
- Bucket policy: Select
Yes, update the bucket policy. This action will automatically add a policy to your S3 bucket, granting the newly created OAI permission to read the objects.
- Select
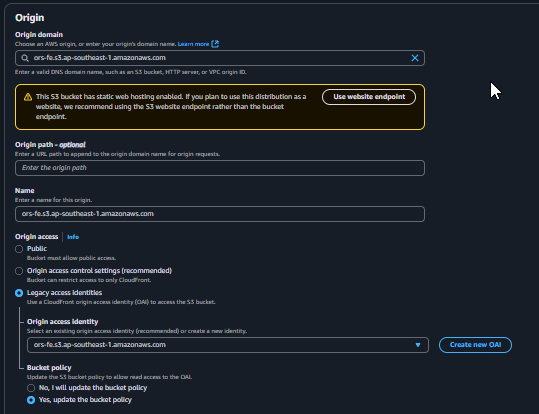
Configure the Origin as an S3 Bucket and create an OAI
3. Configure Remaining Settings
- Web Application Firewall (WAF): Select
Do not enable security protections. - Settings - Price Class: Select
Use North America, Europe, Asia, Middle East, and Africato optimize cost and performance. - Settings - Default root object:
- Type
index.html.This is a mandatory setting. It tells CloudFront which file to return when a user accesses the root domain (e.g., `https://d...cloudfront.net/`) without specifying a particular file.
- Type
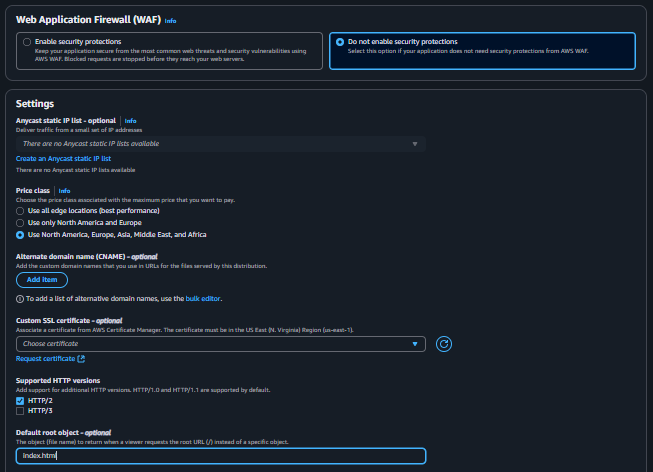
Set up additional settings
4. Finalize, Deploy, and Test
- Scroll to the bottom and click Create distribution.
- As before, the deployment process will take a few minutes. Please wait until the status is no longer
Deploying. - Copy the Distribution domain name value.
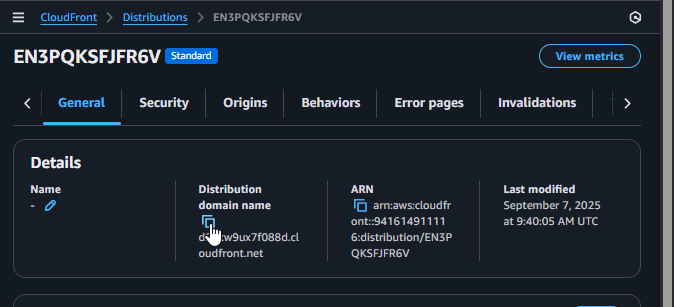
Copy the Domain Name of the Frontend Distribution
- Paste this domain name into your browser. You will see your frontend application load successfully, quickly, and securely through the CloudFront network!